Tracking and Analyzing logs for Remote Desktop task on Windows

In this article, we will explore the features of researching and analyzing RDP logs for Windows. As a rule, the described methods may be helpful when investigating RDP-related activity on RDS (end) Windows servers in forensics operations, where the system administrator must provide details of where users have access to the RDS server, where a particular RDP user has authorized and terminated the session, which device (name or IP address) the user is connected to. I think this information will be useful for RDS company farm managers and owners of different RDP servers published on the Internet (Windows VPS is still very popular).


We can check the Remote connection logs using Windows Event Viewer (“eventvwr.msc”). Windows Logs contains a lot of data, and it's hard to find the event you need. When a user connects remotely to an RDS remote desktop (RDP), the total number of events appears in Windows Event Viewer. There are various logs where you can find information about Remote Desktop connections. We will look at logs and events in the main categories of RDP connections that may be of interest to the manager:


  1. Network Connection
  2. Authentication
  3. Login & Logoff
  4. Session reconnect
  5. Session disconnect


Network communication The establishment of a network connection with a server from an RDP user client. It's an event with EventID 1149 (Remote Desktop Services: User authentication successful). If this event is available, it does not mean that user verification has been successful.

This log is available in: -

  • Applications and Services Logs
  • Microsoft
  • Windows
  • Terminal-Services-RemoteConnectionManager
  • Operational

Enable the log filter for this event (right-click on log -> Filter Current Log -> EventId 1149).


Authentication indicates whether the RDP user has been successfully verified on the server or not. The log is available in "Windows -> Security". You may therefore be interested in events with EventID 4624 (Account logged successfully) or 4625 (Account failed to login). Please note the LogonType value in the event description. If the Remote Desktop service is used to create a new session during login, LogonType = 10. If LogonType = 7, it means the user is reconnected to an existing RDP session.

Logon refers to the RDP login in the system, an event that occurs after a user has been successfully verified. It is an event with EventID 21 (Remote Desktop Services: Session Login successful).

These events are available at

  • Applications and Services Logs
  • Microsoft
  • Windows
  • TerminalServices-LocalSessionManager
  • Operational

As you can see, here you can find the user's RDP session ID - Session ID.

Session Disconnect/Reconnect – Session disconnection/reconnection events have different IDs depending on what caused user disconnection (disconnection to inactivity, Disconnect option has been selected by the user in the session, RDP session ended by another user or an administrator, etc.).

You can find these events in the logs located in

  • Applications and Services Logs
  • Microsoft
  • Windows
  • TerminalServices-LocalSessionManager
  • Operational

Let’s consider the most interesting RDP events:


EventID – 24 (Remote Desktop Services: Session has been disconnected) – a user has disconnected from the RDP session.

EventID – 25 (Remote Desktop Services: Session reconnection succeeded) – a user has reconnected to the existing RDP session on the server.

EventID – 39 (Session A has been disconnected by session B) – a user has disconnected from the RDP session by selecting the corresponding menu option (instead of just closing the RDP client window). If the session IDs are different, a user has been disconnected by another user (or an administrator).

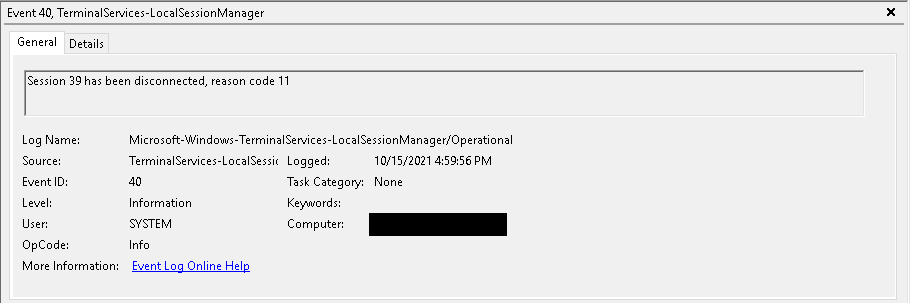
EventID – 40 (Session A has been disconnected, reason code B). Here you must view the disconnection reason code in the event description. For example:

reason code 0 (No additional information is available) usually means that a user has just closed the RDP client window.

reason code 3 (No additional information is available)

reason code 5 (The client’s connection was replaced by another connection) means that a user has reconnected to the previous RDP session.

Reason code 11 (User activity has initiated the disconnect) means that a user has clicked the Disconnect button in the start menu.

reason code 12 (No additional information is available)

The event with the EventID 4778 in Windows -> Security log (A session was reconnected to a Window Station). A user has reconnected to an RDP session (a user is assigned a new LogonID).


The event with the EventID 4799 in “Windows -> Security” log (A session was disconnected from a Window Station). A user has been disconnected from an RDP session.


Logoff refers to the user log-off from the system. It is logged as the event with the EventID 23 (Remote Desktop Services: Session logoff succeeded).

  • Applications and Services Logs
  • Microsoft
  • Windows
  • TerminalServices-LocalSessionManager
  • Operational

At the same time, the event with the EventID 4634 (An account was logged off) appears in the Security log.


The event with the EventID 9009 (The Desktop Window Manager has exited with code <X>) in the System log means that a user has initiated logoff from the RDP session with both the window and the graphic shell of the user have been terminated.

How to fix save and close issue of maintenance records in Sage 50

How to fix save and close issue of maintenance records in Sage 50

Unable to save maintenance records


Summary

  1. Unable to save employee records
  2. Can't add new sellers / customers
  3. Unable to edit existing vendors / customers
  4. Unable to make changes to employee records
  5. Unable to save new or scheduled budget
  6. Unable to save account chart
  7. All fields are gray
  8. Shows Error: "Sage 50 cannot be started" after deleting DDFs
  9. Cannot edit user rights / roles
  10. Unable to make changes to work
  11. Unable to save new job

Cause

  1. Sage 50—U.S. Edition running in Compatibility Mode
  2. Damaged files
  3. Bad conversion
  4. Pervasive database engine is damaged
  5. Permissions not set correctly
  6. Character limit of the field has exceeded the limit
  7. All machines are not on same version or Service Release

Google Chrome installation with PowerShell

Google Chrome installation with PowerShell

Google Chrome- Basic information

Google Chrome began building in 2008 and was only released on Microsoft Windows. The name is derived from the graphical interface frames, or "chrome", of web browsers. Google later released a large split code source as an open-source format under the Chromium project name, enabling codes to run and scan code thus expanding the browser in Mac and Linux applications.

Although chrome was only released for the first time on Microsoft platforms, it quickly found the next one on the market. This thunderstorm may be due to the clean interface the users are giving you while browsing the Internet. The web browser user interface is an important factor in choosing which browser to use. A clean and comprehensive browser gives users distractions while browsing. The last thing the user wants is to browse the web pages in a crowded window. This is where the browser gains its audience.

Benefits:

  1. It is highly recommended that chrome use the JavaScript engine to enable the next generation of web applications
  2. Uses a separate Tab process. According to Chrome, if one-tab crashes, only that tab crashes. You can still work with others.
  3. Easy Installation Process: The installation of Google Chrome is as easy as piece of cake.
  4. Fast: Compared to other browsers it is faster. But it needs to be even faster.
  5. The combined search box and URL box are really interesting. You can type your search and the URL bar comes with related sites and makes browsing easier.
  6. When you open a new tab, chrome comes with your recently viewed websites, with a larger size than an icon to make it easier for you to visit your regular sites.
  7. Chrome uses a platform to use a browser that reduces OS requirements.

Disadvantages:

  1. Unlike other browsers, when you close the browser, it does not ask if we want to close all tabs or the current one.
  2. Security: More personal information is stored in chrome which may be a security issue.

Installation with PowerShell

To start with this, the very first step is to open PowerShell as an administrator. Paste the below command and hit enter and it will take some time to get the installation completed.

$LocalTempDir = $env:TEMP; $ChromeInstaller = "ChromeInstaller.exe"; (new-object System.Net.WebClient).DownloadFile('http://dl.google.com/chrome/install/375.126/chrome_installer.exe', "$LocalTempDir\$ChromeInstaller"); & "$LocalTempDir\$ChromeInstaller" /silent /install; $Process2Monitor = "ChromeInstaller"; Do { $ProcessesFound = Get-Process | ?{$Process2Monitor -contains $_.Name} | Select-Object -ExpandProperty Name; If ($ProcessesFound) { "Still running: $($ProcessesFound -join ', ')" | Write-Host; Start-Sleep -Seconds 2 } else { rm "$LocalTempDir\$ChromeInstaller" -ErrorAction SilentlyContinue -Verbose } } Until (!$ProcessesFound)

Windows Event Viewer

It is an unquestionable fact that error messages are inevitable. However, if you are taking proper care of your PC, you'll minimize the number of PC errors you receive.
As far as the error message can’t be eliminated, it’s recommended to be prepared to accommodate them, this can also be advisable because the bulk of PC errors aren't as serious as most of the users perceive them to be.
When you encounter a mistake, the primary thing you want to do is to read the displayed error message and see if it pinpoints or provides a touch on what's wrong. Oftentimes, the error messages provide a plan on what's causing the error.
In case no error message is displayed, open the PC error log using the Event Viewer and bear its contents to search out out what's wrong. Here Windows Event Viewer plays a big role to find out the information, error, warning, critical, and verbose.

What is Windows Event Viewer?

Event Viewer is a tool that displays detailed information about a significant event on your computer. Windows Event Viewer can be helpful while troubleshooting the problems and errors.

We are talking about Event Viewer if you are looking to learn cybersecurity the Windows Event Viewer is something that you should be very familiar with as you start diving deep into cybersecurity. You're gonna hear of something called a sim it's SIEM (Security Information and Event Management) but it's pronounced sim by most security professionals.

This is a Windows feature so we can go to our search area and type in Event Viewer now we should have an option for Event Viewer showing up to open.

We have errors, warnings, general information, audits (audits successes and audit failures) now what is important to note about this is this is a great way to troubleshoot different issues that you could be having in your environment. This is a great way to also make sure that you are keeping up to date on any security events or errors that could be happening within a system.

Types of Event Level

  • Critical
  • Warning
  • Verbose
  • Error
  • Information

There are lot more option to filter the search.

Aimi is Slow or Freezes when Sending/Receiving Messages

Aimi is Slow or Freezes when Sending/Receiving Messages
It is an unquestionable fact that error messages are inevitable. However, if you are taking proper care of your PC, you'll minimize the number of PC errors you receive. As far as the error message can’t be eliminated, it’s recommended to be prepared to accommodate them, this can also be advisable because the bulk of PC errors aren't as serious as most of the users perceive them to be. When you encounter a mistake, the primary thing you want to do is to read the displayed error message and see if it pinpoints or provides a touch on what's wrong. Oftentimes, the error messages provide a plan on what's causing the error. In case no error message is displayed, open the PC error log using the Event Viewer and bear its contents to search out out what's wrong. Here Windows Event Viewer plays a big role to find out the information, error, warning, critical, and verbose. What is Windows Event Viewer?

Why Fields in OfficeTools are being Cut Off?

Fields in OfficeTools are being Cut Off

As we all know that the default DPI of a system is set to 100% (96 DPI). DPI full form is Dots per inch. Same as another program OfficeTools WorkSpace is configured to work with Windows default DPI of 100%.

When the DPI setting is higher than the Windows default it can result in the cut-off error of the programs. Also, corrupted profiles or temporary available cache files may cause this problem.

Solution 1

  1. With OfficeTools WorkSpace closed, right-click on the OfficeTools WorkSpace Icon and click on Properties.
  2. Go to Compatibility tab and check the box of "Change high DPI settings"
  3. Check the Override high DPI scaling behavior. Scaling performed by box and change the drop-down to System.
  4. Click on Apply and OK. Then open OfficeTools WorkSpace.

Solution 2

  1. Navigate to this locations
  2. C:\Users\username\AppData\Local and delete the temp folder

    C:\Users\usernameDaniel\AppData\Local\Microsoft and delete the Windows folder

  3. Relaunch the OfficeTools program.

Aimi Fails to Launch

What to do if Aimi Fails to Launch?

AIMI full form is Alert and Instant Messaging Interface and used as a companion instant-messaging application. It is installed with the OfficeTools WorkSpace and ready to go with it on your desktop.

Sometimes working with Aimi, if you are receiving a message that it cannot be launched or just failed, it might be because of the corrupted XML file.

To get this issue sorted out, we need to reload the XML file by just deleting it. Please follow the steps below for this:

  1. Navigate to the Roaming folder of the user who is having the issue with AIMI loading and slect the folder called Office Tools Professional
  2. Inside this folder you need to delete the file named AimiWindows.xml
  3. Re-launch Aimi.

How to Change the RDP Port for a Windows Server?

In this era, security is a big question for all the orgnization. By default the RDP port is 3389 and to secure the first thing that come to our mind that is there a way that we can modify the port for the RDP access to add an extra layer of security.

Port numbers in computer networking represent communication endpoints. Ports are unsigned 16-bit integers (0-65535) that identify a specific process or network service. IANA is responsible for internet protocol resources, including the registration of commonly used port numbers for well-known Internet services.

  1. Well Known Ports: 0 through 1023.
  2. Registered Ports: 1024 through 49151.
  3. Dynamic/Private : 49152 through 65535.

TCP ports use the Transmission Control Protocol, the most commonly used protocol on the Internet and any TCP/IP network. TCP enables two hosts to establish a connection and exchange streams of data. TCP guarantees delivery of data and that packets will be delivered in the same order in which they were sent. Guaranteed communication/delivery is the key difference between TCP and UDP.

UDP ports use the Datagram Protocol. Like TCP, UDP is used in combination with IP (the Internet Protocol) and facilitates the transmission of datagrams from one computer to applications on another computer, but unlike TCP, UDP is connectionless and does not guarantee reliable communication; it's up to the application that received the message to process any errors and verify correct delivery. UDP is often used with time-sensitive applications, such as audio/video streaming and realtime gaming, where dropping some packets is preferable to waiting for delayed data.

Changing the RDP from Registry first

Press “Windows + R” to open the Windows Run dialog. Type “regedit” in the Run box and press Enter to open Windows Registry Editor.

Once the wizard open navigate to the below location:

HKEY_LOCAL_MACHINE\System\CurrentControlSet\Control\Terminal Server\WinStations\RDP-Tcp\PortNumber

Right click on PortNumber and Edit > Select Decimal Type > Create a new port number that you want, and then click OK.

Changing the RDP From Firewall

The newly set RDP port must be open in the firewall before it can be used. About how to open a port in Windows Firewall, please refer to

Changing the RDP from PowerShell

  1. Open PowerShell as an administrator
  2. Run this command Set-ItemProperty -Path 'HKLM:\SYSTEM\CurrentControlSet\Control\Terminal Server\WinStations\RDP-Tcp' -Name 'portnumber' -Value XYZ

Once all this is done, we need to restart the Remote Desktop Service to get that affective. And, now to access through RDP we need to make a bit change that is abc.india.com:portnumber

Enable advance scaling feature in windows server 2019.

We have many complaints about DPI settings that can no longer be set in Windows server 2019 as in 2008R2. Having this feature is best in the case of a large screen. It only occurs with the remote desktop session. Because the remote control session display settings feature cannot change.

Windows Server 2008 R2 has a feature to set up the solution after logging in to a remote desktop session. But, Windows Server 2019 does not have that feature. Also, it is a big problem for those who use the big screen in their work.

The RDP conform is in line with the local. Thus, by changing the local system configuration we may find it running on a remote server. So, here comes the preview rating system for Windows Server 2019 which has a rating scale from 100-500.

To make RDSH functioning with DPI for Windows server 2019 RDSH we need to add a registry code:

Registry Hive HKEY_LOCAL_MACHINE
Registry Path SYSTEM\ CurrentControlSet\ Control\ Terminal Server\ WinStations
Value Name IgnoreClientDesktopScaleFactor
Value Type REG_DWORD
Enabled Value 1
Disabled Value 0

After making the above changes, new sessions should have the ability to use DPI. To check it we need to sign out from the system and sign back in.

Please try and answer if you are able to deal with this problem using the above procedure.

Why and how to change the password of a computer?

As we all know that password is a part of security. We must change our password to ensure the security of the computer account. If we do not change the password on a regular basis, your familiarity with your password would eventually lead to its compromise. Hackers use automated tools to guess password.

In this modern era, we use computer, and server to carry a lot of our sensitive data, so keeping work data safe is major priority. Changing the password avoids a number of dangers – including some that are less obvious, such as what happens to the password you have saved on computer you no longer own.

Giving someone a computer with saved passwords is like giving them access to your accounts. Consistently changing your passwords will mean that even if someone has found an old password of yours, it will no longer be relevant or useful.

Process 1.

  1. To change your remote server password, press the ctrl-alt-end keys all at the same time on your computer keyboard.
    • To change your local computer password, press the ctrl-alt-del keys all at the same time on your computer keyboard.
  2. Choose the Change Password option that appears on the screen.
  3. The Change Password dialog box will appear. Enter your current password, along with your new password twice.
    • Please note that campus passwords for faculty and staff need to be at least 8 characters long, cannot closely resemble a previous password and must contain 3 out of 4 of the following items: lowercase, uppercase, number and symbol.
  4. Hit the Arrow button next to the last password box, and your password should be changed.
  5. Log Out/Sign Out of the computer and log back in, to verify that your password change has gone into effect.

Process 2.

  1. Open notepad
  2. Paste this VBScript
  3. Set objShell = CreateObject("Shell.Application")

    objShell.WindowsSecurity()

  4. Click on File
  5. Save As
  6. Browse your Desktop
  7. Name its Password Change.vbs
  8. Save
  9. Close the text file and go to your desktop and double click on it
  10. The Change Password dialog box will appear. Enter your current password, along with your new password twice.
    • Please note that campus passwords for faculty and staff need to be at least 8 characters long, cannot closely resemble a previous password and must contain 3 out of 4 of the following items: lowercase, uppercase, number and symbol.
  11. Hit the Arrow button next to the last password box, and your password should be changed.
  12. Log Out/Sign Out of the computer and log back in, to verify that your password change has gone into effect.

Process 3.

    To change a local account password, use these steps:

  1. Open Settings
  2. Click on Accounts
  3. Click on Sign-in options
  4. Under the "Manage how you sign in to your device" section, select the Password option
  5. Click the Change button
  6. If you are on local computer

    If you are on a remote computer
  7. Confirm your current password
  8. Click the Next button
  9. Create a new password
  10. Specify a password hint that won't make it easier for others to guess your secret phrase
  11. Click the Next button
  12. Click the Finish button
  13. After you complete the steps, the password will change in your local account

Process 4.

  1. Open command Prompt as an administrator
  2. Type net user and hit enter to find the username of which you want to change the password for
  3. net user username create-a-new-password
    • If username is in two part like AJ Tiwari, you need to user inverted comma and then the user name will be like "AJ Tiwari"
  4. net user "AJ Tiwari" Admin@123
    • If username is Administrator (In one word only), no need to use inverted comma.
  5. net user Administrator Admin@123